
ABI Gravel Grader – Quick Start Guide (Driveway Grader)
Transcript
Welcome to the ABI family. And congratulations on the purchase of your ABI Gravel Grader. We’d like to take a few minutes to walk through the Gravel Grader setup process. The tools you’ll need for this project are a hammer, a three quarter inch socket and wrench, and a seven sixteenth inch socket and wrench. You will also need a phillips head screwdriver or screw gun with a phillips head bit and a pocket knife. Please remember to use appropriate safety equipment such as goggles and gloves.
To begin remove the four screws that hold the crate to the bottom pallet. Carefully remove the crate and set aside. Cut all straps that secure the tool to the skid. Remove the box of hardware. Use bare materials to support grader frame for assembly.
Next, we can set all the parts off to the side and verify that everything is present. First, let’s install both angle iron brackets using that four 1/2 inch by two and a half inch carriage bolts. Secure it with a single washer and a nut. Be sure not to tighten any of the nuts and bolts until after you’ve completed assembly. To install the center tongue, you will need to use the half inch by two and a half inch carriage bolt with a washer and nut. Attach the tongue between the two angled brackets that you installed previously. Next, attach the center of the tongue to the frame using the half inch by five and a half inch carriage bolt. Secure with a single washer and nut.
Next, we’re going to install the control box and standalone battery holder. This is attached by using a half inch by three and a half inch carriage bolt. Secure it with a single washer and nut. From here we have two ways to proceed. If you’re using a tow vehicle battery to power the ABI Gravel Grader, then you will plug in the eight foot wire harness into the pigtail coming from the gray control box. The other end of the wire harness will connect to the twelve inch battery harness provided. Use the alligator clips to connect the red wire to the positive battery terminal, and the black wire to the negative battery terminal. We have included plastic zip ties, so you can secure the wire harness to your tow vehicle. Please route your wiring in a safe manner to avoid pinch points in high heat areas. If you have decided to purchase a separate battery that can be mounted and removed from the ABI Gravel Grader, you can set aside the eight foot wire harness. The battery needs to be a twelve volt, non-spillable, sealed, lead acid battery. We recommend battery number 12180.
After setting the battery in position, connect the twelve inch wire harness into the pigtail from the control box. Attach the red alligator clip to the positive battery terminal and the black alligator clip to the negative battery terminal. Be sure to use the strap provided to secure the battery and wire harness in position.
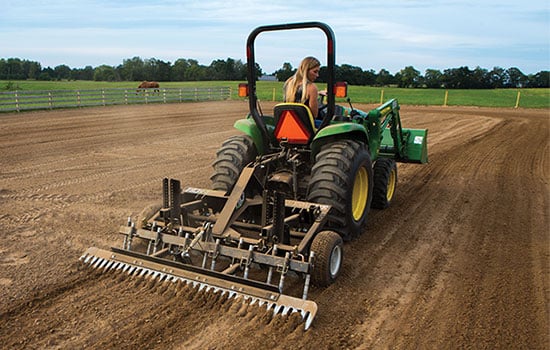
Now we are ready to install the rocker shaft. Position the tubes, so that the notched side of the shaft faces the front of the Gravel Grader. Locate the square receiver connected to the rear spring system, insert the rear facing end of the rocker shaft into the square receiver and secure with a half inch by two and three quarter inch standard bolt with two washers and a nut. Use the larger of the bent pins and a quarter inch r-pin to attach the center of the tube to the top of the angle iron brackets reinstalled in step one. Please install the r-pin all the way to the base of the pin.
Now we are ready to install the actuator. First, bolt the bottom of the actuator to the center of the tongue, using quarter inch by one and a half inch standard bolt with two washers and a nut. Now, utilize the wireless remote to extend the actuator so that the top hole in the inner stroke lines up with the hole on the rocker shaft. Complete the connection by using the quarter inch by two inch standard bolt, with two washers and a nut to secure the two components together.
Next, it’s time to install the side plate and gravel capture wing to the grader box. The side plate in the wing are interchangeable and can be used on either side of the box. The wing is designed to help grab the loose gravel from the edge and help pull it back into the driveway. To install the side plate, use two half inch by two and a half inch carriage bolts with one nut and one washer per bolt. On the opposite side of the grader box, use two 1/2 inch by one and a half inch, carriage bolts, two washers, a half inch nut, and the wing handle adjustable knife to attach the wing to the box. After tightening the wing handle, be sure to adjust the handle so it’s facing upwards. To do this, you push on the center button of the handle, pull the handle towards you, and turn. Now attach the crown control handles to the top of the grader box. For this step, you will use a half inch by two and a half inch standard bolt, half inch bushing, two washers, and one nut per handle. Make sure to insert the handle into its position on the frame before you insert the appropriate hardware. Grab two of the bent pins and linchpins provided and insert them into the caring positions provided on the back of the frame. You will use these pins in conjunction with the crown control handles, when crowning your drive, and when locking the grader box into transport position.
Next, connect the adjustable hitch bracket to the tongue of the Gravel Grader. Installing the hitch requires two 1/2 inch bent pins, along with two quarter inch linchpins. One pin will be used to connect the hitch to the tower on the tongue. The other pin is used to connect the Gravel Grader to your tow vehicle.
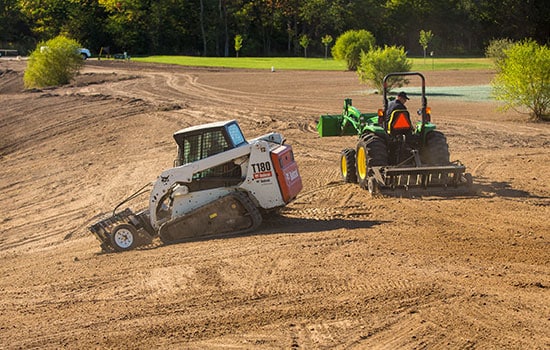
Finally, go back and tighten all bolts before you remove the tool from the skid. The two angled brackets from step one should be perpendicular to the ground and tight to the tongue. If a tow vehicle is unavailable, you can remove the Gravel Grader from the skid by asking a friend to help. Grab the tongue and the front frame and carefully lower the tool off of the back of the skid. Rotate to make it easily accessible to your tow vehicle. If a tow vehicle is available, utilize the last provided half inch bent pin and quarter inch linchpin to secure the Gravel Grader to the tow vehicle.
Raise the grader box to its highest position by using the wireless remote to fully contract the actuator. The down button will contract the actuator, which will raise the box. With a grader box all the way up, use the two bent pins stored in the rear of the frame to pin the box into travel position, insert the pins through the side of the frame, and through the crown control handles on both sides of the unit. Once the Gravel Grader is free from the pallet and attached to your tow vehicle, you can pull the tool forward off the pallet.
That’s it. Congratulations on a successful assembly. Now, before you get to work, let’s talk two basic setup and adjustments. First, adjust the hitch to level the frame of the Gravel Grader according to your tow vehicle. The feature you’ll use the most on the Gravel Grader is the electric actuator and adjustable grader box. During operation, keep the wireless remote easily accessible so that you can make depth changes as you grade. Pressing the up button on the remote causes the actuator to extend and lowers the grader box to the ground. Pressing the down button on the remote contracts the actuator and raises the grader box off the ground.
On the back of the tool, you have an adjustable top link. The top link is used to control the pitch of the grader box. Contracting the yop link pitches the grader box forward. As the top link contracts, the ripping teeth become more engaged, and the blade at the rear of the box is lifted away from the ground so that it carries less material. This is a great position for initial decompaction. Extending the top link pitches the grader box backward. As the top link extends, the ripping teeth become less engaged, and the blade in the grader box captures more material. This is a great position for moving and firming up loose gravel.
As you adjust the height and pitch of the grader box, you’ll find it helpful to adjust the gravel capturing accordingly. When attempting deep decompaction, keep the capturing angled up and out of the way. When using the box a move material or attempting to reclaim material from the shoulder of your workspace, angle the capture link down to full material in.
Use the handles bolted to the top of the grader box to engage the Gravel Grader’s crown control feature. Choose which side of the grader box you want engaging the surface, and pin the opposite side’s handle securely to the frame. Lower the grader box and the Gravel Grader will engage your work surface on an angle so that material will flow across the box’s blade toward the center of your drive.
After use, or when towing long distances, lock the grader box into transport position, use the crown control handles and pin the grader box up out of play. Doing so extends the life of the grader’s primary components.
We understand that every situation is different, so we encourage you to experiment with the various settings available on your ABI Gravel Grader. Once again, welcome to the ABI family and if you have any questions, contact the ABI support team at 855-211-0598.