
TR3 E-Series – Operational Help & Basic Arena Renovation
Transcript
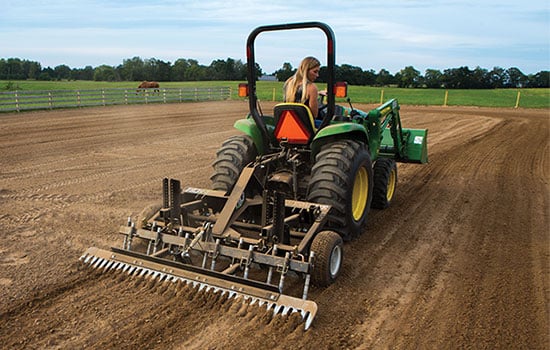
Hi, I’m Mike. I’m the senior technician here at ABI. Today, we’re gonna be talking about how to renovate your arena and how to maintain it after you’ve renovated it. Today, we are going to be using a TR3 E series. It’s a lot like the TR3 classic. And as we go through the steps on renovating today, we’re also going to explain the differences between the two. So this video can work for either tool if you’re looking for clues or tips on how to grade maintain your arena.
One of the most important things is, is water. If you notice the soil. If you reach down and pick up a handful of soil. If if the soil is real dry and you go to make a ball when you let go, it just falls apart. When you get the right moisture content, it kind of stays together in a ball. And that’ll help put ease on your tractor. You won’t have as much… It’ll break up better. You won’t have as much pull and resistance against you. So getting it nice and moist is a big thing.
Another another deal is the a ABI TR3 E-Series is designed for your subcompact tractors. So a lot of times with your subcompacts, you’re going to have to make sure that you have weights on the front. Or if your tractor is equipped with a bucket on the front, you won’t have to have weights. We suggest you consult your dealer or your owner’s manual and make sure that you have a properly set up before you start your grading.
OK, another hint is with your subcompact tractors. Sometimes if you’re trying to reach a depth of like six inches for like your gaming contestants and you know, barrels, examples like that; A lot of times what you want to do is you want to start only breaking up two inches at a time, then move to four inches and then move to six inches just so you don’t put as much stress on your tractor. Once you’ve accomplished this and you keep it maintained on a regular basis, you won’t have to go through this painstaking step and go two, four, six. You should be able to drop it all the way down and maintain it.
A couple of weeks ago, we already started a little bit of maintenance on this arena. We came out with four people, rarely ever have even driven a tractor, and none of them had any prior grading experience with a tractor. This arena originally was completely bowled at both ends. And I’m talking five to eight inches deep holes. And we had high spots in the middle and all around the outer edges. So we did a little bit of work prior to this. But today we’re going to just start finalizing it and getting it in, getting it nice and level and smooth and making it a proper arena.
What we’re gonna start with today first is we’re gonna get a can of paint and we’re gonna go through and start marking it. X are circles in our high spots and then marking Xs in our low spots. That way when we get ready to grade and loosen, we know when our high spots are and when we get later, when we go to push what we’ve already loosened up, then we can back blade and push it into our low areas.
OK. First thing I do is I’m going to come in. If I have a professionally installed base, I’m going to take my foot, my hand, a shovel, whatever you want and dig down so I can find the depth of my base because one of my main things is to not get into my base and cause any damage to that. So after I’ve done that in quite a few areas around the arena, I know my highs, I know my lows, then I get a can of marker paint and what I’ll do is I’ll come back and look stand back slightly. I see my high spot starting over in here. OK. Now, now that we’ve decided where our gigh area is, we want to come by. We want a mark it. I’m going to circle it out.
If you notice down at this end now we have the opposite there, we mark our high. Now we’ve got a bowled out area from the riding, all of dirt over the years been pushed out. So now in our low area, I’ll put an X, so that I know this is the area where I want to come along and drop soil.
Now, one of the main things, again, when we’re working with low areas, we want to make sure if we have our if we have a professionally installed base, that when we come by to drop soil, we slowly lift the rake so that we don’t gouge into our base.
OK, on the TR3 E series, you can unpin the tire. You’ll notice you have three different holes. Basically, the lowest hole is for about one and a half inch of growing, and it’s your standard maintenance hole. Your middle hole is going to go approximately four inches in depth, three to four inches. And that’s for breaking up or renovating an arena. And then your top hole, that’s going to be for you again for like your gaming contestants where you want to do that six inches a depth so you get good grip or to totally rip and renovate and get down real low. Again, can’t stress enough. Be careful of your base. Choose your hole based on how deep your base is.
Today, we’re just going to go in the first hole, because we’ve already done some renovating. We’re just doing some light work. Also, today’s customer, they requested to only have about a two inch bass and they want a lot of grip. So we’re what we’re going to do a little differently today. Later on, we’re going to set our profiler only about an inch and a half deep, and then we’re going to put our grooming rods about two inches deep to give them less footing, but more grip. Another neat thing we found is a lot of times we put the two by fours under the wheels. Remember that two two by fours equals three inches of depth or height. So when we set our tool down on top of the two by fours, now we know right now our tire is riding three inches, holding our tool up three inches above the surface. So when we go to set our profile blades and our grooming rods. We can say, these, we want to go an inch off the ground. Our front one, we want to go about an inch and a half off the ground, and then we’ll find our spot that we want to start. Pull it forward a little bit, and after after we’ve pulled it forward 10-15 feet, I like to get out and take my hand and actually pull back the dirt. See the depth of the profile blade. Again, on the grooming rods, make sure I’ve got my depth that what I wanted.
The wood blocks are a wonderful way to visualize the depth so that you have your tires up in the air and then you can move your different components you want, whether it be profile blades, scarifiers, grooming rods, to your desired depth.
Another nice and unique thing, and it was purposefully done, is the upright leveling blade towers on the TR3 E-series. They were made so that when you engage it in the ground to have that set so that it grades properly, all you have to do is make sure that these are running vertically level. If they’re pitched forward or backwards, then you just go and adjust your manual top link. Once you have it set properly, you’re leveling blade will automatically pull your high areas and drop them into your low areas. You won’t have to have the skill of maneuvering your lift arms on your tractor up and down to do the grading. It automatically does it for you.
OK, now that we’ve accomplished marking our highs and lows in the arena, next we’re gonna go through and we’re gonna drop our scarifiers down. And today we since we have him in the first or the bottom hole on the tire, we’re gonna put them in the second hole. That’s gonna give us an inch and a half, two inches of depth, the scarifying action, to break up the high areas so that later we can push him backwards into the low spots.
Okay. If you notice, we just to test it, we actually engaged our TR3 into the ground, pulled it forward about ten foot. And if we notice we’re pulling a little bit too much material, it’s starting to dump over the top of our leveling blade. So what we can do to compensate for that and to make it work better, we can go to our leveling blade, remove one of our straight pins, lift it up and pin it, and we’ll pin both sides. But this will allow it to not carry too much because we don’t want to dump it over the top of the blade. Now, the neat thing about this, and it’s very unique on our tools is also if if you’re we have a lot of sand you had brought into your arena and you want to move a lot of sand at one time, then you can push it all the way down, pin it on top so you can use it as a box blade. You can grab and pull more material at one time. Also, a lot of times you’ll want in some arenas you’ll want to pin it up. But you still want to keep. You still wanna be aggressive. You still want to be able to pull only if you have a lot of high spots. So then you might limit. You might put a pin here and the pin here. So you limit the amount of flow it has.
Also with the leveling blade, if you get your arena too loose, you have two different ways and compacting it. You can lock your leveling blade down more to give it more compaction and put more angle on your finish rake so that it also helps pack it to get rid of the loose footing that you may have over adjusted using your profile blades or, your grooming rods. So the nice thing about this tool, the way it’s built, there’s many ways to compensate for operator error or setting setup error. So you can go back and repack and get the footing the way you like it.
Now that we have all of our scarifiers set for our depth that we want to break up the high compacted areas, we’ve got him all set, pinned in. We’re ready to get on the tractor and start breaking up our high spots, so that later we can push him into our low areas.
You’ll notice as I was dragging, I was trying to be very cautious of making sure when I got to my high spot, I was dropping my TR3-E, but then when I got to the other edge, when I got to where it got low again, I lifted it. Again, you know, we’re making sure we don’t get into that base when we get to our lowers, for now, we’re gonna lift until we get them… until we get the footing moved around, to get a more consistent level ness of the arena.
Now that we’ve loosened our areas in our arena that we want to push backwards to move into the lows, we’re actually going to want to change the position of our top link. We’re gonna want to pitch the angle of our rake backward more. When we’re trying to get some of the components, such as a scarifiers grooming rods, and a profile blade out of use, and we want to get closer to the ground with the back finish rake so that we can easily push the loosened topsoil back into the low spots.
OK. A lot of you might have the classic TR3 version and not the TR3-E, and all of these steps we’ve done today you can do with the TR3. Now when you go to set your TR3 up for pushing backwards with your finish rake, if you bought the optional profiler, you want to detach it before ever pushing backwards. If you push backwards with the profiler, you’re going to bend the weldment because it’s a floating finish rake. So you’ll want to detach that. And then a lot of you will have the hydraulic top link so you can simply just move your pitch to angle your finish rake down further towards the ground.
Okay. Now that we’ve pushed our highs into our lows, now we go back and we’re gonna readjust our top link and we’re gonna adjust it again so that the towers for leveling bar are running vertically level and that will automatically set the pitch of your profile blade and your finish rake and everything to match up as it goes along.
Now, after after you’ve done some adjustments, you want to drop in the ground, pull it forward 10, 15 feet, and then look again, make sure these are running vertical. Because what happens is if you’re profile blade is up on an angle, your tool, any of our tools will tend to float, and they’ll leave like little waves out the back. If you have them on the opposite direction, you have pointed down too far; it’ll actually suck the tool down into the ground again, damaging your base.
OK. Now that we’ve got the tool in the ground, we’ve pulled forward 10, 15, 20 feet. Well, again, we check these are level vertically now. What we want to do actually pull some of the footing back. Now we see the depth of our profile blade. We’re about an inch and a half deep, which that’s what this customer asked for before we started this. And then we go back and also check our grooming rods. Our grooming rods, they wanted a little more footing. So we suggested that we go two inches deep on the grooming rods and only an inch and a half on the profile blade. So the top, when we’re finished, the top will be soft. But then when you get down to the inch and a half, it’ll have a flat surface. And then… but if your horse goes to turn fast or to dig in to get traction, it’s going to go through that other half inch and get more footing.
Now, some of you are going to be doing different disciplines, and you may want to smooth slick surface to slide. Dressage, reiners. You want more of a slide. So then we can change it and do the opposite thing. We can put that down two inches. This an inch and a half or whatever depth you want. And then like your gaming contestants a lot of time with gaming, you’re going to actually want to go a total of six inches deep. But what we like to suggest, because you do have so much of an investment in your horses and let’s face it, they’re almost a family member now. What we do is the profile blades, we put them down about three inches and then we’ll take the grooming rods and go all the way to six. What this does is make what we call a false base. So when your horse is running at full bore, it’ll be only in three inches of footing. But then when the horse gets to the barrel to turn and dig, it’s going to go through that three inches down to the six to get good grab and to be able to pull out safely without damaging their stifles.
All right. Once we’ve made our adjustments, we’ve got our grooming rods and our profile blades, scarifiers, whatever we’re using, working at the depth we like. And we’ve sure reassured that by going back and pulling back some footing to check. Now we’re ready to start the spinning technique. The spinning technique; you start out by doing a line around the outside of the arena walls, go all the way around, but we’re going to do is make our one lap around the outside. And then after we’re done, we’re gonna divide the arena in half with one strip straight up the middle. And then we’re going to start what they call a spinning technique. We’re going to start small circles starting at one end of the arena as we do our circles. You want to make sure that you always maintain and even speed. Remember, as you give extra gas to the tractor, the front the tractor raises, which tips the tool. Vice versa, if you slow down the front of the tractor drops and the tool picks up. So keep it a constant speed is going to keep you nice and level. So once you start making your circles, though, start working your way, overlapping your outside tire all the time on the area that you’ve already graded, that keeps one tire in the level that you’ve already set.
All right. Now that we’ve done our spinning technique on our whole arena and we’ve got everything broken up, we want to walk through our arena. We want to check our footing. Is it too loose? Did we loosen it too much? Is a depth lock correct? So we can go back and make those changes. If it’s too loose, we can put more down pressure on our leveling blade and our finish rake, and then we can readjust our ground components and we can raise them up a little bit so we’re not digging as deep. And then you’ll you’ll also notice that today, if you’ve seen in the video, sometimes when I was doing my spinning technique, I was leaving a real mark for my front tractor tire. And this was because the tractor we had available has large turf tires on it. So the TR3 E series was not actually wide enough to cover the tire tracks. You won’t have this. We have a product specialist that’ll work with you. They’ll get the numbers off your tractor, and they’ll make sure they match up to get the proper tool for the tractor that you have that you’re going to use in your arena.
Now, if you have the classic TR3 I forgot to mention earlier, before you start your spinning technique, make sure you go ahead and reattach your profiler attachment. If you have that option for yours. Reattach that. Make sure you set it level. If you have questions on how to set it up properly, we do have a video available online to do that. If you call us at customer service or numbers 855-211-0598, we can send you a link to help guide you and show you how to set that up properly.
So now if you’re happy with your depth and you’re fairly level, you’re not going to be perfect at this point. But now we’re going to start what we call our final grade. What we’re gonna do is we’re gonna start from dead center of the arena. We’re going to drive straight down dead center to the other end and then cut to the outside, make one lap around the outside, and then go on the outside of where we went last time and keep working until we’ve completed the whole thing. The only path that you’re going to continually cover is your outside path as you come in, because we want to look nice and straight. We want the corduroy effect. That’s our signature effect. The corduroy effect from the finish comb layout. Make it look like a nice straight, flat arena.
Okay, just to go over a few things at the end of the video here, before you push backwards, you want to make sure that on all your high spots, you went through them and broke them up first. Remove the compaction, make it lighter because you only want to push broken up loose material with the TR3-E. With the TR3 Classic, it’s more of a rigid, it’s a set finish rake on the back. It’s not adjustable. So it gives it more rigidity. So you can push a little heavier material with a classic TR3 than you can with the TR3-E. The TR3-E again, break it up with scarifiers first get some loose soil, loose footing, and then push it backwards into your low spot. Now again, your spinning technique and your final grade. That’s pretty much your basic maintenance. The spinning technique automatically levels. It keeps your arena level. And the final pull is what you do just to make a nice looking, solid, straight pulled finish at the end.
So if you have any questions at any time, don’t hesitate. There’s many of us here at the customer service department. We’re on call, ready to help when you need us. Our number to customer service is 855-211-0598. Thank you very much. Have a great day.