
TR3 Leveling Blade – A CLOSER LOOK (ABI DIRT)
Transcript
Hey everyone! Matt Metzger here with ABI Attachments. Welcome back to another episode of ABI Dirt. On the show today, we’re going to take a closer look at the next generation of tractor attachments. I’m talking about the TR3. Now, here’s the thing. I’m not supposed to have favorites. We’ve got dozens of attachments. I’m supposed to love them all the same, the way I supposed to love my kids all the same. But the TR3 is my favorite. When I first started at ABI Attachments, I was on the production team. I was building our tools. And the TR3 was the first tool I ever learned how to build. And it’s about as near and dear to my heart as a piece of steel supposed to be near and dear to your heart. So I’m thrilled we get to talk about the TR3 today. The TR3 is actually one of Kevin Keigley’s initial inventions and it really launched ABI’s mission statement to empower the world with better ways to get outdoor work done. Because Kevin at the time owned a landscaping company and he needed better ways to get outdoor work done. It has a really unique approach to leveling and finishing. And it’s all about that floating leveling blade. And that’s the topic of today’s episode.
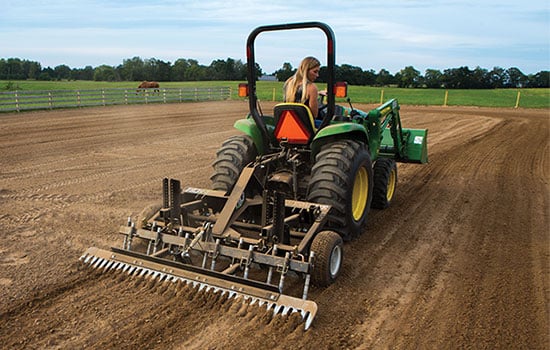
So here we have an eight and a half foot Cat II TR3. This actually is one of a demo unit we had out back. So it might be a little bit bigger than what some of you are used to seeing. Right inside in the heart of the TR3, this beautiful hunk of steel right here is the floating leveling blade. And it is the topic of today’s Closer Look. So we’ll take a look at the design first.
First of all, you can see that it pivots off the front of the frame here with those grade eight bolts welded up, scoops down and to the part of the blade that actually holds the material. And then these fins out here to the back that provides it the adjustability, which we will talk about in just a second.
So if you’re doing any kind of dirt work at all, you probably want the end result to have a level contour to it, whether it’s horse arenas or seedbed prep or gravel driveways. Remember, whatever walks or drives across, whatever you’re working on is going to feel any divot or undulations, which is why most dirt and gravel attachments have some kind of leveling feature. The uniqueness here in the TR3 is that we call it our floating leveling blade. This blade actually floats and what allows it to float is this front pivot point being attached to the tool here on the front of the frame. It means that as the tool is being pulled behind the tractor material begins to build up on this front face. That pushes the blade back into this whole system, raises up.
So before we go any further on this Leveling blade, let’s stop and talk about the elephant in the room. Right? A lot of you who have used traditional tractor attachments like the Box blade or the Land plane, you’re used to seeing your ripping teeth, your Scarifiers, your J shanks upfront, and then you’re the leveling component in the back of the tool. As I’m talking about this leveling blade, you probably have noticed our scarifiers are behind our leveling feature, which means we are decompacting after we’ve made an initial leveling pass. I’m sure a lot of you are thinking, hey, Matt, I thought you were supposed to loosen up your material before you can level it. My my ground so hard I’m not going be able to move anything unless I rip it up first. I hear you. There’s a strategic reason why we put our leveling function, our level component before our decompacting component. And that’s because any leveling component on any attachment is going to recompact your surface. However much material you have built up in front of this leveling blade that material actually acts like a roller. And as it moves and rolls in from the leveling blade, the weight of that material is again repressing down on whatever your surface is. So if you’re leveling component is in the rear of your tool, you’re recompacting whatever material, soil, seedbed, arena, driveway, whatever it is, you’re recompacting impacting it after you’ve made the pass. The last thing that touches the surface is pressing down on the soil, whereas on the TR3 the leveling happens first. Then the decompaction. Then the finish on the rear end.
So now that we’ve talked about the design of the Leveling blade and why the Leveling component is in front of our decompacting component, I want to take a look at adjustability back here. And I know these towers don’t look that significant. It’s just a couple of holes in it. But this plays a huge role in how the leveling blade functions and it helps you customize the use of the tool for your specific application. So remember, we call this the floating leveling blade in order to maximize the design of the float of that blade. You need to have this pin in such a position that is higher than the blade that allows the blade to float up and down. This means as material builds on the blade, it pushes the blade back. This arm raises up. And then as you get to a low spot downward undulation in your surface. This blade pushes back down and that constant motion as you’re driving the TR3. You wait for those who are out there who have experienced it, hear that? Bang, bang, bang, bang. That’s these level arms banging against your bent pins because that blade is working hard for you to level out your surface. So that is the float position. That is the kind of the factory default. What we recommend for everyone, because most of you out there are trying to get a level contour somehow.
Now, if you were in a situation where you just want to decompact you say, Matt, right now I’m just tearing something up. I don’t care how level it is. I’ll come back at it later than you can by all means, take these bent pins, take him all the way out to play, even lift this leveling blade up and drop a pin under it pinning that leveling blade up so that that leveling blade isn’t even touching the surface now. That’s rare. Typically, if you’re decompacting and you also want to level. But if there’s a situation you say I don’t even need to level right now, just let me rip. No problem. Pins under the under these arms and you can keep the little blade out away.
The other end of the spectrum there is that if you’re in a situation where say no, Matt, I get it. I see the float. I like the float. But sometimes I want to lock this pin in and just function like a rear blade, function like a box blade. I want to grab the most amount of material possible and move it. Great. No problem. Pop your pins out, drop them in so that they’re right on top of this leveling blade so that leveling blade can’t float. That is going to maximize the pull. It’s going to maximize the resistance on your tractor. But it’s going to maximize the amount of material that leveling blade can move, not floating, not getting the benefits of the automatic rise and fall, but you will be able to move a mountain of material.
So the last component I want to talk you through and the closer look of the floating leveling blade are these wear plates bolted to the front. I know not the most glamorous thing to talk about, wear plates in a way to end up a closer look. But these are pretty significant. First of all, they add a significant amount of weight, again, for a 7 1/2 foot TR3, because of these plates bolted in across the front. you’re looking at 150 hundred and sixty pounds of weight. Second thing is we don’t want you to have to replace an entire weldment. So we want to give you some steel up front that sits below the leveling blade so that as you use this TR3 for years and years and years, that’s eight and halfer is gonna outlive me. I’m sure that you’re actually just wearing on these plates rather than the bar.
Now, for you skeptics out there that say, well, you just want to tell us more wear parts this steel is actually AR2-35 abrasive-resistant steel, which means this don’t go bad. You’re going to put a lifetime of work on these leveling blades before you’re ever gonna have to swap them out. We just want to make it easier that when that decade does come that it’s a whole lot easier to swap out a couple of plates than it is to swap out an entire weldment. Second note on these wear blades, as you actually see this wing sitting out here to the side, most of you have already guessed this wing is to capture any material that is trying to roll out past the tire so that as you begin to collect the material, that floating action takes place, that you don’t lose all of that, all that material off to the side.
Hope you enjoyed a closer look at the TR3 and the Leveling blade, which is, again, one of the most simple yet revolutionary components on that attachment. If you own an ABI product and we’d like some insight onto why we designed something the way we did. Go ahead and leave me some comments, some questions below. I’d be thrilled to read through and do a segment in the future on something that is actually on your tool. And if you just like seeing closer looks and you’re interested in the products and what we do and why we do it, make sure to hit that subscribe button like the video, share it and come back for future episodes. Take care everyone. Until next time.